SyncMe Orders & Fulfillment Guide
Manage orders from all your stores in one place
Managing orders across multiple channels can get messy. SyncMe’s Order Management gives you one place to view orders from all connected stores and update key details (status, address, and payment method). When supported, changes sync back to the original store.
In this guide, you’ll learn how to view orders in SyncMe, open the Order Details page, and update important order information.
To follow this guide, you’ll need a SyncMe account. SyncMe offers a Free Trial, so you can try the platform and access the dashboard for free.
👉 Create your account (no credit card required)
✅Before you start
To follow this guide, you’ll need a SyncMe account. SyncMe offers a Free Trial, so you can try the platform and access the dashboard for free.
- Connect at least one sales
channel (store) to view orders.
- Import and link your
products across channels (recommended) so inventory updates can be synchronized
properly.
- If your orders list is
empty, add products to your store and start selling to generate orders.
- Open Orders from the left menu.
- Use the store cards for a quick count of orders in each status. Status labels differ by channel.
- Use My Orders to see individual orders from all connected stores together.
- Each row shows customer name, order date, channel, order number, total, and status.
- Use Search to find an order. Filter by Order Channel, Status, Price, or Date.
- Use the order date control to sort where available. Select a row checkbox for available actions.
- Read the status in the rightmost column. Labels such as New, Processing, Completed, Fulfilled, and Unfulfilled vary by store.
- Open the Excel dropdown above My Orders.
- Choose Export Orders for order data, Download Invoices for invoices, or Download Noon Shipping Labels for Noon shipments.
- Select the relevant rows when the action applies to selected orders, then follow the on screen prompts.
Figure 2. Excel action menu showing Export Orders, Download Invoices, and Download Noon Shipping Labels.
Review an order
- Select an order in My Orders to open Order Details.
- At the top, find the SyncMe order number and copy icon, order date, tracking ID and edit icon, and payment badge.
- Use Order Status to change an available status, Download Invoice for this order, or Cancel Order when cancellation is intended.
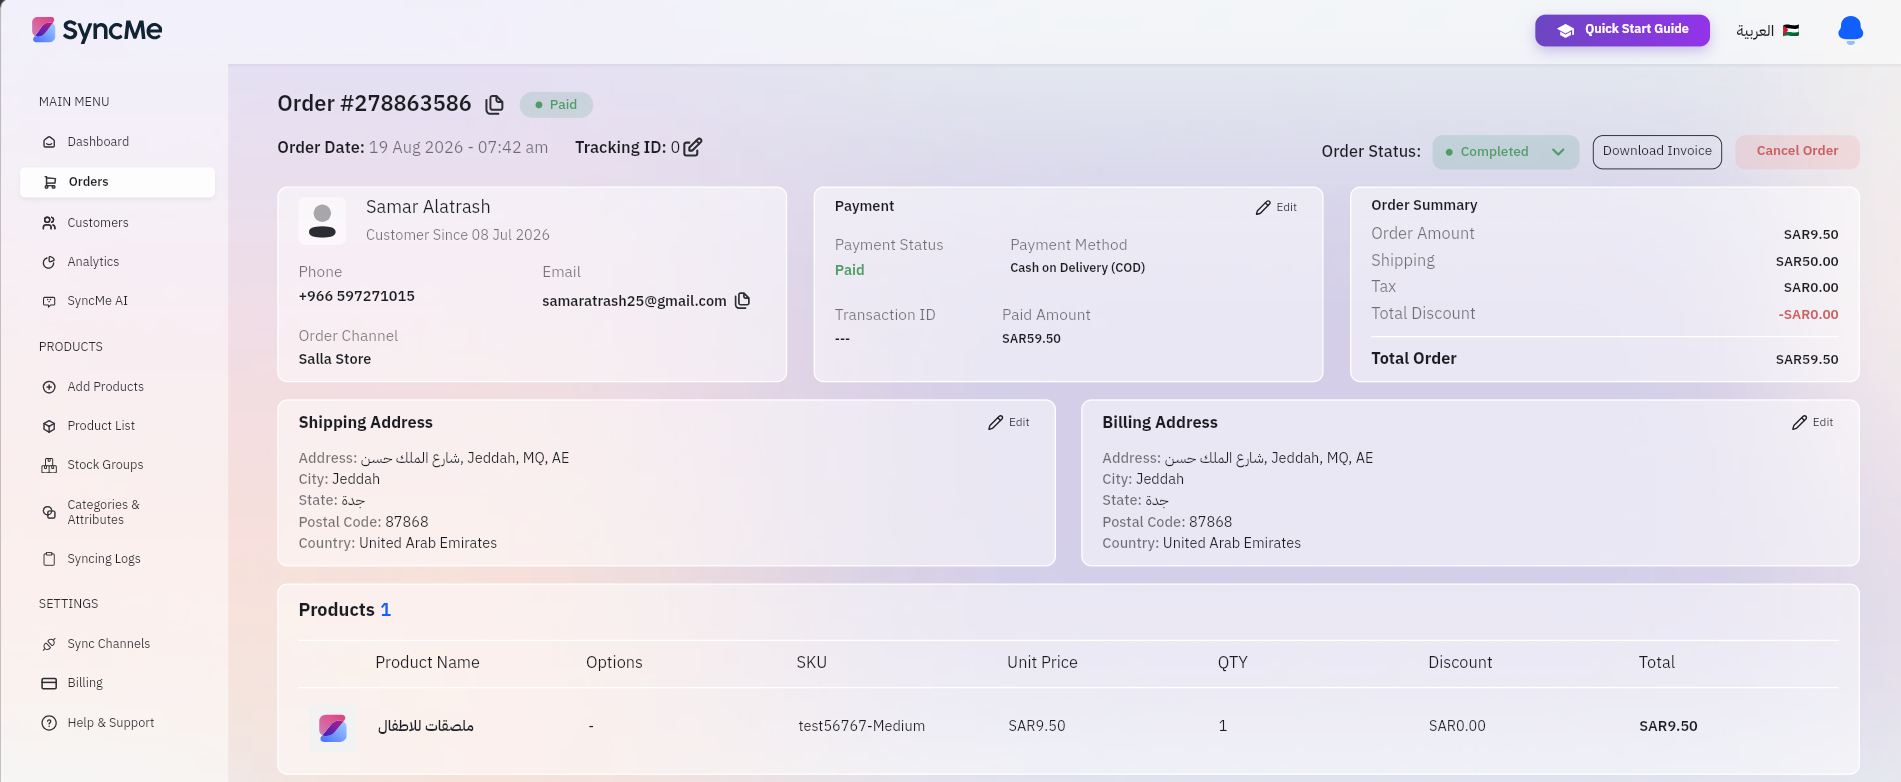
Figure 3. Order Details page showing customer, payment, addresses, totals, products, and the order controls.
Customer: name, customer since date, phone, email, and originating store.Payment: status, method, transaction ID, and paid amount. Select Edit to update an editable payment field.
Shipping and Billing Addresses: address, city, state, postal code, and country. Each card has its own Edit control.
Order Summary: order amount, shipping, tax, discount, and total. Check the displayed amounts for the specific order.
Products: item name, options, SKU, unit price, quantity, discount, and line total. Link matching variant SKUs across stores for stock syncing.
Change fulfillment status
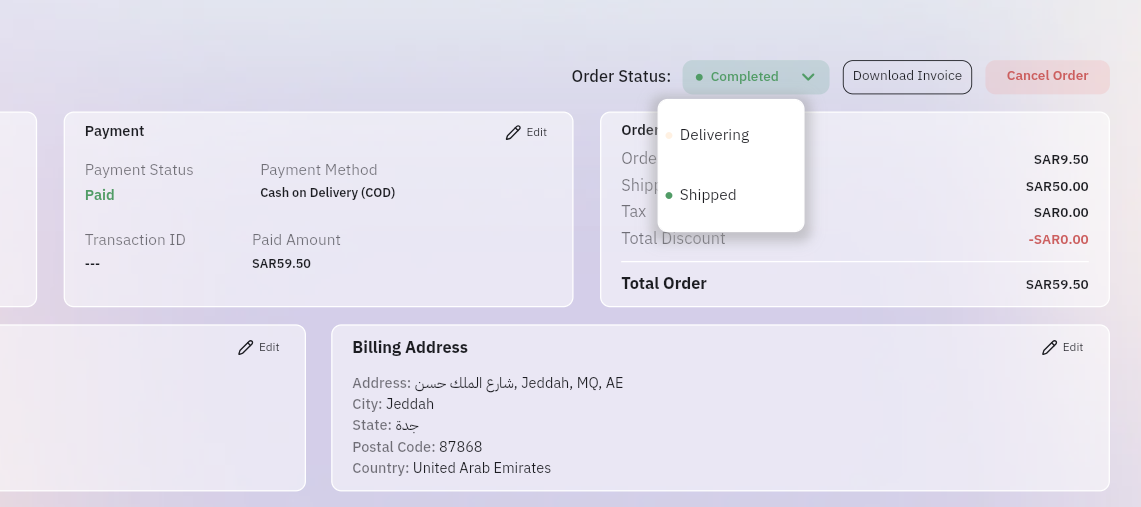
- Open the Order Status dropdown and choose an available status.
- In Figure 4, Completed is selected; Delivering and Shipped are visible choices.
- Available choices depend on the store and current order state. Confirm the saved change in the original store when writeback is supported.
- Select an order in My Orders to open Order Details.
- At the top, find the SyncMe order number and copy icon, order date, tracking ID and edit icon, and payment badge.
- Use Order Status to change an available status, Download Invoice for this order, or Cancel Order when cancellation is intended.
Figure 3. Order Details page showing customer, payment, addresses, totals, products, and the order controls.
- Open the Order Status dropdown and choose an available status.
- In Figure 4, Completed is selected; Delivering and Shipped are visible choices.
- Available choices depend on the store and current order state. Confirm the saved change in the original store when writeback is supported.
Figure 4. Order Status dropdown with the current Completed state and visible Delivering and Shipped options.
- Scroll below Products to find Order Notes and Activity Logs.
- Select Add Note to record an order note.
- Activity Logs show dated events. Figure 5 records a change from in_progress to completed and the order’s creation from Salla.
- Use the timestamps and store order number to trace the order history.
Figure 5. Lower Order Details page with the product row, Add Note control, and dated Activity Logs.
 Important: When you update the order status, address, or
payment method in SyncMe, the change is reflected in the related store/channel.
Important: When you update the order status, address, or
payment method in SyncMe, the change is reflected in the related store/channel.Fulfillment and Inventory Sync Across Channels
- Orders created in any connected channel appear in SyncMe, giving you a single place to track sales.
- When an order is created and a product is linked across channels, stock can be decreased across other connected channels.
- Fulfillment/status updates made in SyncMe are pushed back to the original channel (where supported).
- To ensure this works correctly, link products across
channels using matching SKUs (including variant SKUs) and confirm all intended
channels are connected.
▶️ What to do next
- Place a small test order on
one channel and confirm it appears in SyncMe.
- Test an update (like
changing the order status) and confirm the change is reflected in the original
store.
- Review your inventory
syncing and Sync Rules to make sure quantities update the way you expect.
🚀 Start Managing Your Stores with SyncMe
SyncMe helps you manage products, inventory, and orders across multiple sales channels from one centralized dashboard, reducing manual work and keeping your stores aligned.
You can start with a Free Trial to explore the platform and see how SyncMe helps simplify multi-channel management.
👉 Create your SyncMe account and start your Free Trial
👉 Learn about plans and subscriptions: See the Billing & Subscription Guide.
🔗 Related articles Use these next steps after this overview:
SyncMe helps you manage products, inventory, and orders across multiple sales channels from one centralized dashboard, reducing manual work and keeping your stores aligned.
You can start with a Free Trial to explore the platform and see how SyncMe helps simplify multi-channel management.
👉 Create your SyncMe account and start your Free Trial
👉 Learn about plans and subscriptions: See the Billing & Subscription Guide.